Grilled Asparagus with Prosciutto, Fried Bread, Poached Egg, and Aged Balsamic Vinegar
Posted on 7 April 2010 | 6 responses
So, today in New York it hit 90°F, it almost seems as though have jumped over spring right into summer. Whilst I am excited for summer and am already dreaming of corn on the cob, perfectly ripe Jersey tomatoes and the bounty of berries that flood the green markets all over the city, I still have a soft spot for spring vegetables. After a bleak winter, eating either hearty root vegetables or some weak tasting imported produce I welcome the asparagus, leeks, bunches of celery, and fresh garden peas that are now in most supermarkets.
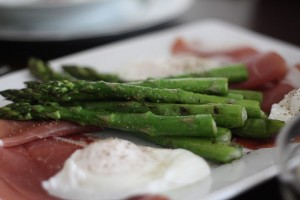
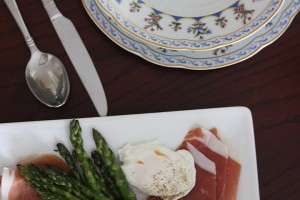
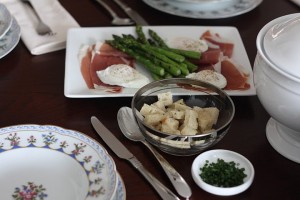
I think this recipe is the perfect transition from spring into summer. It has the asparagus from the spring but you grill it, giving it a smokey taste and feel, reminiscent of summer barbeques. When combined with the softness of the poached egg, the crunch of the croutons, the saltiness of the prosciutto and the sweetness of the aged balsamic, you have the best of all worlds!
This recipe is from Thomas Keller’s latest book Ad Hoc at Home, named after his casual dining restaurant in Napa Valley. The hubby and I ate there when we went to Napa a couple of years ago and thought that our three meals there (we went back a couple of times during our week stay!) were the best food we had during our trip. If you don’t have this book yet I suggest you buy it, your tummy will thank you!
Notes: an ice bath is a bowl containing cold water and ice. They are used commonly in kitchen to ‘shock’ food, which means to immediately halt the cooking process by reducing the temperature drastically. They are frequently used when blanching green vegetables as it allows them to maintain their vibrant color. For this recipe, I would recommend a medium to large mixing bowl.
Before placing the egg in the water to poach them the water is stirred. While researching this article I read online that this is to reduce the water temperature, this is not the case. The movement in the water creates a force on the egg making it more likely for the egg to stay in a pretty spherical shape. The purpose of the vinegar is to coagulate (or thicken) the egg white.
Once you have finished step one you can refrigerate the eggs in the ice water for several hours.
To grill the asparagus you will need either a charcoal or gas grill (if you have one it means you are lucky enough to have a garden!) or if you live in a little New York apartment, like me, then you will need a grill pan. We have this great cast iron one and I can’t recommend it enough.
Grilled Asparagus with Prosciutto, Fried Bread, Poached Egg, and Aged Balsamic, serves 6
2 tbsp white wine vinegar
6 large eggs
2 bunches asparagus
Canola oil
3 oz thinly sliced prosciutto
2 cups torn croutons (or you can use these easy ones)
Extra virgin olive oil
Aged balsamic vinegar
Fleur de sel
1. In a large, deep saucepan, bring 6 to 8 inches of water to the boil. Prepare an ice bath (see above). Add vinegar to the boiling water and reduce heat to a simmer. Crack one egg into a small ramekin. Using a spoon, stir the water at the edges of the pan twice to get the water to swirl, add the egg to the center of the pan and simmer gently for 1 1/2 minutes, until the white has set but the yolk is still runny. Using a slotted spoon, carefully remove the egg to the ice bath. Skim and discard any foam on the top of the water of the saucepan. Repeat with each egg.
2. Prepare your charcoal or gas grill to cook at medium heat or place your grill pan over medium-high heat. Break off the less tender end of a stalk asparagus, by bending it and seeing where it snaps (if the asparagus is fresh, it should not be too far up). Trim the rest of the stalks to an equal length. If you are using thick asparagus, as opposed to pencil thin asparagus, peel stalks. Spread asparagus on a parchment lined baking sheet, coat with canola oil and season with salt and pepper.
3. Arrange on grill and cook for 1 1/2 to 2 minutes on each side, until the stalk are tender. Arrange on a platter.
4. Meanwhile, bring a large pot of water to a simmer. With a small pair of scissors, carefully trim any uneven edges from poached eggs. Lower eggs into the water for 30 seconds to quickly reheat. Remove with a slotted spoon and blot with a paper towel. Season and arrange with asparagus.
5. Arrange prosciutto and croutons on the platter, drizzle with olive oil and balsamic and sprinkle with fleur de sel.
Key Lime Pie
Posted on 6 April 2010 | 8 responses
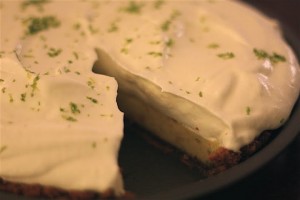
Recently I was in Key West for my sister-in-law’s bachelorette weekend. While we were there we enjoyed embracing the local relaxed culture (it was spring break after all!), trying their famous conch fritters and a plethora of local drinks… on a side note, be careful of the Rum Runners, they are stronger than they seem! Sadly I did not find one of my favorite desserts while I was there. I was on the look out for a Keys native, Key Lime Pie. I have made this pie countless times at home but have never had a slice that I have wanted to eat more than a bite of in a restaurant. For some reason, lots of places seem unable to make this dessert well. As I was researching and writing this post I began to think about why that is, and I decided to analyze the most commonly used ingredients.
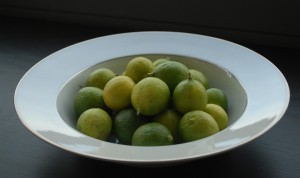
The obvious highlighted ingredient is the key lime, its’ juice and its’ zest. Key limes are different from the usual Persian limes that we are used to seeing in the supermarket. The first time I bought key limes I did not know what they were and bought them more for their ‘cuteness quota’ than to cook with them (this is also the reason that I presently have two quarts of kumquats waiting in my fridge!). Key limes are far smaller than regular limes and have a thinner, more edible skin and are usually lighter in color, ranging from a yellow to a mid-green (the key limes most commonly found in the US, the Mexican key lime, are a darker green than most other key lime varieties), and their juice is more tart than regular lime juice, due to its’ high acidity.
I am going to hazard a guess and say that most restaurants aren’t using freshly squeezed key lime juice. They may be using regular lime juice, which could be why the pies taste too sweet or they could be using bottled key lime juice, which could be why they taste too bland and generic. Key limes are not the easiest fruit in the world to find, so this could be part of the reasoning behind why they are not using fresh juice. It also could be the fact that key limes are torturous to juice, I am not using too strong a word there. I do not consider myself an annoyed or unhappy person but tell me to extract a cup of juice from a bag of key limes and I’ll get there pretty quickly. They are tiny, and either spurt juice with wild abandon, often into an eye, or refuse to give you anything more than a trickle. They also contain more seeds than you would think possible for such a small fruit, meaning you have to try to prevent seeds from getting into your juice or you have to chase them around your measuring cup to get them out. So trust me, I completely get why people, especially people making multiple pies, would try to cut this corner. Personally, I think, if you are baking just one pie, you should do it. Also imagine how rewarding it will be knowing you didn’t cheat (just keep telling yourself that as you are squeezing those limes!). If you just can’t bring yourself to make freshly squeezed juice I saw this brand all over Key West, I was half tempted to get some myself!
So to make your task a little easier, I will give you the run down on the tools you can use for the job. I tried using a citrus press and nearly exploded, the key lime didn’t release any juice, kept falling off to one side and you get hand cramp in about 5 minutes. Next I tried a handheld reamer, now I love reamers and when ours mysteriously went missing I did not know what to do with myself until I bought another one, but again it was too large for this small fruit. The best thing I have found so far is a fork, it seems to work better than anything else but I’m still not satisfied. Looking around online I found this juicer and I think I’ll be investing in one before I next make another key lime pie!
The second bone I have to pick with most commercially made pies is that they use processed egg yolks. I know that it is far easy for a business to pour out a set amount of egg yolks than it is to crack and separate the eggs themselves but something about them feels icky and chemical.
The only exception I will make to this, is when a pie is made with the traditional recipe. Original key lime pies are not baked, the high-acidity key lime juice was used to ‘cook’ the yolks which thickened the filling. In the distant past when someone first stood in their kitchen and made a key lime pie, people did not have to think about salmonella, unfortunately now, it is a very real fear. I have chosen to use a recipe that requires the filling to be baked. I am going to experiment with an unbaked filling, and if I find one that I like enough I’ll post it but I will have to use these egg yolks in a carton I dislike so much.
Notes: in the ingredients I have specified that the butter needs to be melted and cooled. I know this is annoying from a time point of view but I tested both ways, just melted and then melted and cooled and found that the crumbs absorb the hot butter quicker so not all the crumbs get covered in buttery goodness. It may take a little longer until the butter cools but it will result in a better crust.
Key Lime Pie
1 1/2 cups graham cracker crumbs, Nabisco brand (about 9 crackers)
6 tbsp unsalted butter, melted and cooled
3 tbsp granulated sugar
1 14-oz can sweetened, condensed milk
4 large egg yolks
1/2 cup freshly squeezed key lime juice (about 1 pound of key limes)
1 tbsp freshly grated key lime zest (zest of about 7 key limes)
Whipped Cream Topping
1 1/2 cups heavy cream, cold
1 tbsp sugar
1. Heat oven to 375°. In a medium bowl, combine crumbs, butter and 3 tbsp sugar, stir until well mixed. Press into a 9-inch pie pan. Bake for 6 minutes, until crust is fragrant and lightly browned. Remove from oven and allow to cool to room temperature.
2. Lower oven temperature to 325°. Whisk condensed milk, egg yolks, key lime juice and zest. Pour into cooled crust. Place in oven and bake for 30 minutes until the filling is set but quivers if you shake it slightly. Allow to cool completely.
3. Whip cream and sugar until soft peaks form, about 3 minutes on medium speed of a stand mixer or 7 minutes whisking by hand. Spoon over the cooled pie, using the back of the spoon to form peaks. Garnish with zest. Cool until you are ready to eat. Enjoy!
Sundried Tomato Pesto Palmiers
Posted on 5 April 2010 | 9 responses
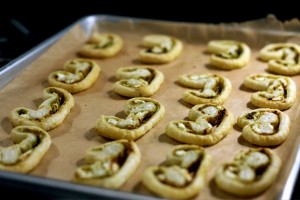
Puff pastry is one item that I always have in my freezer, it only takes 40 minutes to defrost a sheet making it a very quick and easy way to make an tasty bite to eat. I use it for whenever I do not have time to make my own pastry or just want to make a buttery and crumbly something. I use it for the base of tarts, the lid for my chicken pot pie, I use it to make puff pastry straws or twists (which you can make sweet with sugar and cinnamon or savory with a cheese and some herbs). Another great way of utilizing this ingredient is to make palmiers. Palmiers, also known as elephant ears, are simply puff pastry filled with an infinite number of toppings, folded in on itself twice. It could not be easier! You have to allow time for the dough to refirm in between filling and baking, otherwise you are left with soggy puff pastry rather than the puffed up layers we like to see, but the active time is a snap. The filling options are endless so have some fun and get creative with them.
Notes: for this recipe I usually use homemade pesto (I’ll include a recipe in a future post), you can also use store bought pesto. The Le Grand brand makes both a garden pesto, which is packed with basil, garlic and fresh lemon zest and a herby sundried tomato pesto, both which are scrumptious and huge time savers!
In this recipe I recommend using Silpats. Silpats are food grade silicone, non-stick baking sheets. I use them as it saves me countless rolls of parchment paper, which is great for the environment and my pocket! I have two different makes of Silpat, one is from the original company in France, which looks retro and patisserie-authentic, the other is a baking mat from Crate and Barrel which as far as I can tell does exactly as good a job for half the price. Bargain!
I have also included some extra garnishes that I sometimes put in and sometimes don’t. The pine nuts, basil and Parmesan cheese are not essential but just highlight how versatile these are to make. If you are adding the Parmesan cheese I would leave out the finally sprinkle of kosher salt as the cheese contains a large amount of salt.
If the folding and then refolding concept is hard to visualize hopefully the video below will help.
Sundried Tomato Palmiers
1 pound of puff pastry, thawed (2 sheets)
1/4 cup sundried tomato pesto
1/4 cup pesto
4 oz goat cheese
2 tbsp pine nuts, toasted (optional)
2 tbsp basil leaves (optional)
2 tbsp Parmesan cheese (optional)
1. Line a baking sheet with parchment paper or a Silpat.
2. Unfold puff pastry sheet onto a floured surface. Roll out sheet until it is about 10 inches by 12 inches. Spread half the pesto evenly across the sheet. Repeat with the sundried tomato pesto. Crumble half the goat cheese over the sheet. If using, sprinkle the pine nuts or the basil leaves on top. Sprinkle kosher salt over the sheet.
3. Imagining the sheet as a book and using the shorter (10 inch) edges, fold each ‘page’ in half and then the two half in half again. Place the puff pastry on the lined baking sheet.
4. Repeat steps 2 and 3 with the second sheet. Cover the puff pastry with cling wrap. Place the baking tray in the refrigerator for 1 hour.
5. Line 2 baking sheets with parchment paper or Silpats. Heat the oven to 400°F. Slice the puff pastry rolls into 1/4 slices and place them onto the baking sheets, allowing space between each for when the puff pastry expands (about an inch or two). Bake in oven for 12-14 minutes or until the pastry is golden brown. Leave to cool for a few minutes and then enjoy!
Spinach-Tomato Pinwheels
Posted on 2 April 2010 | 7 responses
This weekend we went to the inimitable Hollister and Porter Hovey’s apartment for a deliciously perfect bloody mary brunch. When someone has been kind enough to invite you into their home I hate to go over empty-handed. Knowing that they would have a well stocked bar (they did – Hollister even made her own bacon vodka!), I decided to bring some hors d’oeuvres. As it was a day time event I wanted to bring something that was savory, so they would not compete with the bloody marys and on the lighter scale of the spectrum, not too heavy and not too rich. So these delicious spinach and tomato pinwheels were perfect for the occasion.
The first time I made these I was preparing for a party at our apartment. The other appetizers I had prepared were all on the heavier and richer side (!), containing lots of butter, cream and yummy goodness, but I wanted to serve a little something that was slightly healthy and green looking too. So I took to our many cookbooks, which are stacked in nooks and crannies all over our apartment and I found this recipe. *For full disclosure I am going to let you know that I did not buy this book, but received a promotional copy while I was working at Saveur magazine, (this in no way would make me biased toward a book). I hadn’t really read it but in a pinch I instantly grabbed it when I saw the title, Party Snacks! Ever since, this recipe is one of my go to for quick and easy, daytime snacks. They are also perfect for taking on picnics, you can make them into small hors or serve them cut in half as a wrapped sandwich.
Notes: you can leave the seeds from the peppers in to make it spicier. I usually leave the seeds in one pepper and de-seed the other. Also it is really important to make sure that your spinach is washed and thoroughly dried and the tomatoes are properly seeded as the moisture can make the wrap soggy… which makes it unpalatable. Pinwheels are pretty messy to make and as the blog address suggests we are space challenged. I find this counter mat to be amazing for doing multiple things quickly as you can tidy up in a flash. Our kitchen has black countertops so this mat is also amazing for baking, when flour gets everywhere and leaves a white powder layer on everything.
FYI – Scallions are the same as green onions and are called spring onions in the UK.
The video below is our first try at time lapse video – we know we need to get the camera more still for the next one but we’re still super excited about the outcome! Thank you for watching.
Spinach-Tomato Pinwheels (makes about 80-90 pinwheels)
2 jalapeno peppers, cut into chunks
4 scallions, roughly chopped
2 8-oz packages cream cheese, at room temperature
1/2 of a 0.4oz packet of ranch dressing
1/2 tsp freshly ground black pepper
10 large flour tortilla, 10 inch diameter
5 cups baby spinach leaves, packed
4 to 5 beefsteak tomatoes, seeded and sliced thinly
1. Put the jalapenos and scallions in a food processor and process for 5 seconds, until they are finely chopped. Add the cream cheese, dressing mix and pepper and process again, until everything is well mixed.
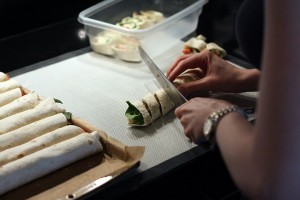
2. Using a butter knife, spread a generous dessert spoonful of the mixture evenly on a tortilla. Arrange half a cup of spinach and a couple of tomato slices on top of the mixture.
3. Roll the tortilla tightly, place on a baking sheet. Repeat with the other nine tortillas. Once they are all rolled and on the baking sheet, cover the sheet with cling wrap and put them in a fridge for an hour.
4. After the hour, slice the tortillas, one by one, into 1/2 inch slices. (I usually snack on the ends as they don’t look as beautiful as the rest, perfect for the host/hostess who doesn’t have time to eat!)
5. Arrange on a serving platter and enjoy!
Absinthe Bay Scallop Gratin
Posted on 1 April 2010 | 9 responses
I am surprised it has taken me over a month to mention that I absolutely adore Ina Garten! I love her simple style of cooking and her ethos of using the best ingredients that one can afford is one that I fully embrace. Her most recent book, Back to Basics, is a continual source of inspiration and, looking through it gives me ideas about future parties or events that we could have. I was drawn to this recipe as scallops are one of the easiest seafood items to cook and you are able to find sustainably farmed scallops relatively easily.
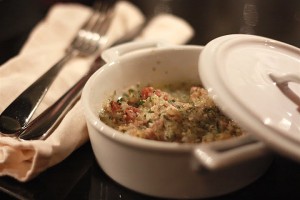
This recipe, from her latest book, is fully loaded when it comes to flavor and tastes as though it would take a lot longer to make than it does. Honestly, the most time consuming part of the dish is waiting for the butter to come to room temperature (30 minutes should do it). It is perfect for a dinner party when you have to rush back from work and put something in the oven pronto. You can even jump in the shower and get ready as the butter is softening!
I like to serve these gratins with some fresh, crusty French bread and a simple salad with a white balsamic dressing.
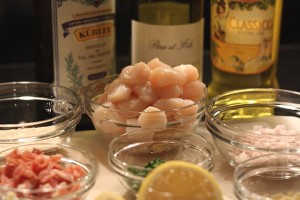
Notes: This recipe calls for bay scallops, which are smaller than regular sea scallops, (I’ve included a close up below). These can be tricky to find if you do not live near their native habitat, which is the North East of the US. If you are unable to find them you can use sea scallops cut into quarters. Also I mention in the ingredients that the muscles have to be removed from the scallops, you can do this by hand or with a small knife. (The muscle is the part of the scallop that attached it to its’ shell in the ocean.)
This recipe did not originally contain absinthe, the Barefoot Contessa recipe used Pernod, which of course works here as well. I didn’t happen to have any Pernod on hand when I first made this dish but, of course, I had absinthe lying around, a leftover from one of our holiday parties!, and tried it out. Now, I would not make the dish without it. I prefer the intrigue and edginess absinthe lends this dish. Absinthe has the anise qualities which this dish needs, and if absinthe was good enough for Van Gogh, Toulouse-Lautrec, Picasso, Hemingway, Oscar Wilde and Edgar Allen Poe, it’s good enough for all of our dinner parties!
I recommend 6-inch wide gratin dishes. I use a mixture of these casserole dishes (which I love! So handy for dips as well) and the 9.5″ by 5.5″ size of these Pillivuyt china serving dishes (they can make anything look fancy, even crudites)
Bay Scallop Gratins
3 tbsp unsalted butter, room temperature
3 large garlic cloves, minced
1 medium shallot, minced
1 oz thinly sliced prosciutto, minced (Parma ham in the UK)
2 tbsp parsley, minced plus extra for garnish
1 tbsp freshly squeezed lemon juice
1 tbsp absinthe (or Pernod)
1 tsp kosher salt
1/2 tsp freshly ground pepper
3 tbsp olive oil
1/4 cup panko (Japanese tempura flakes)
3 tbsp dry white wine
1 lb fresh bay scallops, muscles removed
1. Heat oven to 425°. Place 3 (6-inch round) on a baking sheet.
2. Place butter in the bowl of an electric mixer (i.e. KitchenAid) fitted with the paddle attachment or use a hand mixer. On low speed, add the garlic, shallot, prosciutto, parsley, lemon juice, absinthe, salt, and pepper and mix until combined. Fold in the panko and set aside.
3. Preheat your broiler (grill in the UK), if it is separate from your oven. (I haven’t seen this before but just in case you have some complicated setup.)
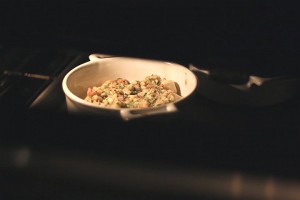
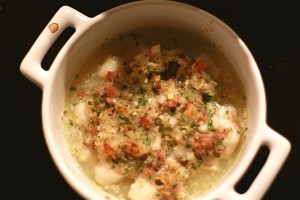
4. Place 1 tbsp white wine at the bottom of each gratin dish. Pat the scallops dry with paper towels and distribute them evenly among the 3 dishes. Spoon the butter mixture over the top of the scallops. Bake for 10 to 12 minutes, until the top is golden and sizzling and the scallops are just done.
5. Place the dishes under the broiler for 1-2 minutes to get the bread crumbs crunchier, making sure to be extra vigilant in case they become too well done.
6. Finish with a squeeze of lemon and some chopped parsley at top.
Osso Buco (part II)
Posted on 31 March 2010 | 3 responses
One of the best things about making a dish like osso buco is the leftover potential. I love to take the meat off the veal shanks and add it to the remaining sauce. The best way to keep the veal as beautifully tender as it was the day before is to reheat the sauce slowly over a gentle, low heat.
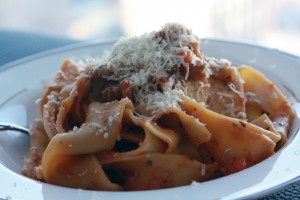
I serve it with fresh egg fettuccine and heaps of freshly grated Parmesan. The fresh egg pasta cooks in 2-3 minutes officially making this a quick weekday meal and perfect for those midweek nights when spending hours over the stove is not something you want to do!
Fresh Egg Fettuccine
Posted on 30 March 2010 | 11 responses
When people extol the many virtues of fresh pasta I often agree with them, but when they do it at the expense of dried pasta I often stop. I do not think you can even compare the two. Dried pasta is something that I always have on hand in the pantry, you can store it at room temperature and it keeps almost indefinitely. It also holds up better to mistreatment, if you forget to pull your dried pasta off the boil a minute too late you may not have the perfect al dente bite you were hoping for but it will still be edible. In contrast one minute too long on the boil with fresh pasta, you will have mush.
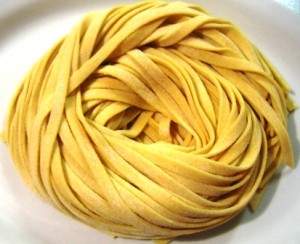
Fresh pasta contains egg and water making it much more perishable, you need to keep it in the fridge and it usually has a shelf life of two to three days. Given fresh pasta’s temperament it is easy to see why it is regarded as such a treat. It has a unique texture and is sinfully silky on the tongue when paired with creamy sauce, like an alfredo. Most supermarkets carry fresh pastas now, so you should be able to find it on a shelf near you. I am lucky enough to live in a city where I can order my fresh egg fettuccine online and it will be delivered the next day (*love Fresh Direct – if you live in New York I cannot recommend this brand more). That being said making pasta at home is time consuming but it is rather fun and it definitely gives you a sense of accomplishment that you have created food from eggs and some flour.
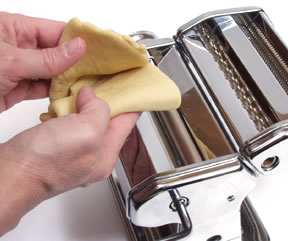
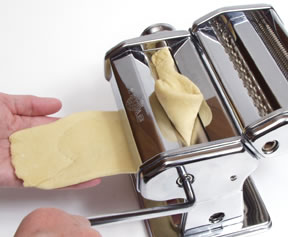
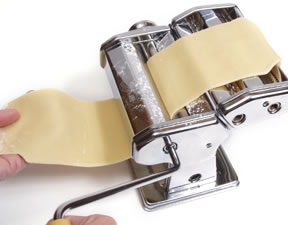
Note: to make homemade pasta I would advise using a pasta maker (you can go traditional and roll it out by hand and cut it yourself but would not recommend it for your first time), I have found this one works well. If you do not want to have extra one use appliance (which I understand from a space point of view!) then you can get a KitchenAid attachment but it is much pricier.
When cooking fresh pasta make sure that you are cooking it in a large pan and plenty of water, it has a tendency to want to stick together so make sure you give it a gentle stir when you first put in the water as well. I recommend 1 gallon of water per pound of pasta. I also love this pot and find it’s the perfect size for cooking pasta and I love the mesh inserts it comes with (perfect for pasta and the steaming basket for things like dumplings, fish or veggies).
Fresh Egg Fettuccine
2 1/2 cups all-purpose flour
3 large eggs, at room temperature
Pinch of salt
1. Place the flour on a clean work surface and make a well in the center. Break the eggs into the well and add salt.
2. With a fork, begin to gently beat the eggs in a circular motion, incorporating approximately half the flour.
3. At this point you should be able to combine all the flour with the eggs.
4. Knead the dough by hand for 3 to 4 minutes. The dough should be soft, pliable but slightly lumpy. Wrap the dough in plastic wrap (cling film) and rest for 20 minutes.
5. Cut the dough into 4 pieces and recover with the wrap to prevent a skin from forming.
6. Using one piece at a time and leaving the rest covered, flatten the piece so it will fit through the pasta machine on its’ widest setting. Roll the dough through the machine, then fold the dough into three (like a business letter fold), making sure to press out all the air between the layers (this process is called kneading).
7. With the smaller end first, roll the dough through the machine again. Repeat five more times.
8. Repeat the process for each of the other three pieces of dough, keeping the other pieces covered.
9. Once all the pieces have been kneaded, roll a piece of the dough through the machine, reducing the setting with each roll until you reach the thinnest setting on the pasta machine. (Do not fold the dough in between rolls).
10. Using the fettuccine blade (should come with the machine), form the fettuccine.
11. Repeat for each piece of dough.
12. In a large saucepan, bring 1 gallon of water to a boil, add 2 tbsp salt, add the fresh pasta, making sure to give it a gentle stir when you first add it to the pot. Cook until desired degree of doneness. (I begin checking after 2 minutes and find it only take 3-4 minutes).
Photos courtesy of cateringonthecoast.com and recipetips.com
Simple Risotto
Posted on 29 March 2010 | 5 responses
I make risotto about once a week. It is a super low cost but absolutely scrummy way of using up anything and everything in the fridge you are not quite sure what to do with. In my fridge at any given time there is usually a couple of random odds and ends of vegetables, the remnants of a block of cheese, maybe some mascarpone and there is always butter, heavy cream and some onions!
And the amazing thing about it is you can make risotto fancier (by adding porcini mushrooms, truffle oil, or lobster) or homey and an easy-peasy weekday meal with some leftover vegetables and meat.
The main expense for this dish is the chicken stock, which if you buy in bulk can be pricey but if you begin making your own… will only cost you pennies!
Notes: to make this vegetarian you can substitute an equal amount of vegetable stock for chicken stock.
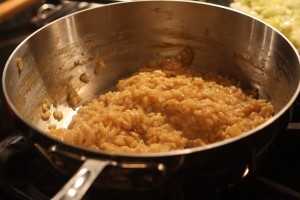
You may not need all the stock when making this risotto. As the recipe explains you add the stock in half cup increments and the amount of stock I use varies each time, but you should not have more than a half cup or so extra. In a good risotto the rice is firm but cooked through. There should be a slight bite to the individual pieces and when you bite through them it should not taste chalky.
You can add extra cream or mascarpone to this dish to ramp up the creaminess. Delish!
Simple Risotto
4 tbsp unsalted butter
1/4 large Spanish onion, minced
1 cup arborio rice
1/2 cup white wine
4 cups chicken stock, hot
1/2 cup Parmesan cheese, freshly grated
1. Heat butter in a medium pan over medium heat. Add onion and cook until soft but not browned.
Add the rice and stir well to coat in butter. Cook for 2 minutes, stirring constantly, you do want to heat the rice but not brown it.
2. Add white wine and stir until absorbed by the rice.
3. Add half a cup of chicken stock, stirring constantly until it has been absorbed. Once it has been absorbed repeat the process by adding another half a cup and continuing to stir. Repeat until the rice is not absorbing any more rice.
4. Stir in Parmesan cheese and taste before seasoning with salt and pepper.
Osso Buco
Posted on 29 March 2010 | Comments Off on Osso Buco
I have always loved braises, using the tougher cuts of meat and making them deliciously fork tender is perfect for many reasons. The first being, braises are dishes you can put on the oven and not really think about until they are done. They are perfect for busy people wanting to have dinner parties, you can prepare everything in advance, put it all in a pan and not really fuss with it until you are serving. The second reason braises are amazing is the depth of flavor you are able to create with the long, slow cooking time. Not to mention the cuts that are used for braising are usually the lower cost cuts, with the time, temperature and the braising liquid helping to break down the tougher connective tissues making it as tender as filet mignon but with far more flavor. This is not necessarily the case with these veal shanks, but I think that they are well worth it as a treat and the rest of the ingredients are low cost.
I first had this osso buco recipe at the uptown Cipriani restaurant in New York while I was still in college. Anyone who knows me is familiar with the fact that very few things make me happier than eating out at fancy restaurants and that I adore Italian everything. As I said earlier braises are so simple and unconsuming of your hands-on time that this recipe soon became a staple and a dish that I pull out whenever I want to make something easy but elegant.
Ossobuco is a Milanese dish, getting its’ name from the Italian translation for ‘hole in a bone’ referring to the marrow-filled shank bone. It has many spellings; in cook books that I own I found three different spellings, osso buco, osso bucco, ossobuco, and many more online. It was traditionally made without the tomatoes, as these were only introduced to Italy in the late 19th century from the New World (for some reason I find it impossible to imagine an Italy with no tomatoes!). Instead it was flavored with cinnamon and allspice but still contained the bay leaf and the flavor injecting gremolada. This older version is called ossobuco in bianco and I may give it a whirl, see how it turns out and, of course, let you know the results. Thankfully though some culinary genius decided to replace tomatoes in this dish giving us what we think of today as osso buco. I serve mine with either a simple Parmesan risotto or a more traditional risotto alla milanese. I’ll post the recipe for the risotto today as well.
Osso Buco
1/2 cup olive oil
4 pounds veal shanks, cut into 1 1/2 inch thick slices
Salt and freshly ground pepper
Unbleached all-purpose flour
3 celery ribs, finely chopped
2 carrots, finely chopped
1 large yellow onion, finely chopped
1/4 pound shiitake mushrooms, finely chopped
1/2 cup dry white wine
1 1/2 cups canned crushed tomatoes
3 cups hot chicken stock
Gremolada
1 tsp lemon zest, finely chopped
1 small garlic clove, minced
2 tbsp flat-leaf parsley, chopped
2 tbsp basil, chopped
1 tsp rosemary, chopped
1. Heat oil, over medium heat, in a pan large enough to fit all the veal shanks in one layer. (I used a 4-quart saute pan which worked perfectly for this recipe and at the moment it is on sale and comes with a splatter screen!) Season shanks with salt and pepper. Dredge in the flour, shaking off any excess and add to the pan (they should sizzle when you add them). Cook until both sides are browned, about 15 minutes in total.
2. Remove veal from pan and place on a plate to the side. Pour off the fat from the pan. Wipe clean with paper towels.
3. Add 3 tbsp olive oil and place pan back over medium-high heat. Add celery, carrot, onion and mushrooms. Cook until softened, about 15 minutes.
4. Add wine, turn up the heat and bring to a boil. Stir constantly until wine has evaporated. Add tomatoes and 2 cups of stock. Add the veal back into the pot, spooning the vegetables and liquid over the shanks. Add more stock to just cover the veal, if you need to add more than 2 cups of stock you should move everything to a smaller pot.
5. Bring the liquid to a boil, lower the heat and cover the pot tightly, simmer for 2 to 2 1/2 half hours until the meat is fork tender. Uncover the pan for the last half hour to reduce the liquid.
6. While the meat is cooking, chop the ingredients for the gremolada and combine them.
7. 10 minutes before serving, remove the veal and keep warm. Boil the sauce to reduce it until it has a sauce-like consistency. Stir in the gremolada, simmer for a minute or 2. Spoon the sauce over the meat.
Serve with a simple risotto on warmed plates.
Pasta E Fagioli
Posted on 17 March 2010 | 5 responses
I feel as though I have always loved pasta e fagioli. It is one of my earliest food memories and if I ever see it on a menu I get slightly too excited and I always order it. This means that I have had more than my fair share of bad bowls of this traditional soup but it also means that I know a good one when I taste it. The stand outs throughout my life have been Marcello’s in Simi Valley, California, which my parents, my sister and I would frequent multiple times over the summers we spent there through my childhood, a restaurant called Puccini’s in Lucca in Tuscany, Italy, which served the soup more lukewarm than hot and finally more recently the now closed Giovanni’s in New York City.
Pasta e fagioli, which simply means pasta and beans in Italian, began from humble beginnings, due to its’ inexpensive ingredients it was seen as a peasant dish. The beans, pasta, stock and the use of leftover marinara sauce (I have substituted this with tomato paste but you are more than welcome to try it) were all readily available around the Italian household. This dish is so well loved that when Italian immigrants moved to New York the soup found it’s way into American-Italian slang; pasta fazul (after the pronunciation of beans in the Neapolitan dialect).
Ever since I have been cooking I have tried to recreate this soup and when I stumbled upon Antonio Carlucci’s recipe I think I found it. I have made a couple of changes for ingredients that I could find more readily but the recipe tastes like truly authentic zuppe pasta fagioli.
Note; this is such a simple soup that all the flavor come through, although I would always advise to use the best quality ingredients that you can, in this situation it is even more important. I have suggested brands and stockists for the harder to find ingredients.
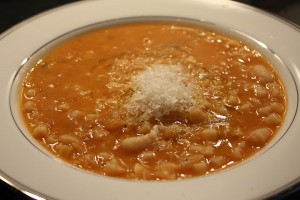
P.S. If you are looking at this picture and thinking it looks like the most warming, delicious, homey soup you could ever make, you’d be right 🙂
Tip: if you are lucky enough to live somewhere where you have access to fresh borlotti beans replace the dried beans with 11oz of fresh, make sure to reduce the cooking time in step 1 to just an hour. To make this recipe vegetarian friendly, just use an equal amount of vegetable stock rather than chicken stock. The jalapeno is optional but I like the little bit of heat it gives the soup, also you can replace this pepper with any small chili pepper.
Pasta E Fagioli
7oz dried cannellini or cranberry (borlotti) beans, soaked overnight, then rinsed and drained
6 tbsp olive oil
1 medium onion, finely chopped
2 basil leaves
1 rosemary sprig
1 quart chicken stock
1/2 jalapeno pepper, finely chopped
1 tbsp double-concentrated tomato puree
Salt and pepper
6oz tubetti or tubettini pasta, or other small tube pasta
4 tbsp extra virgin olive oil, for serving
Parmesan cheese, to taste, for serving
1. Place the soaked, rinsed and drained beans in a medium saucepan and cover with cold water (do not add salt to the water, it will keep the bean skins tough). Bring to a boil, simmer gently for 1 1/2 to 2 hours (or 1 hour if you are using fresh beans). Once the beans are soft, puree half the beans in a blender and mix with the whole beans.
2. Heat the olive oil over medium-high heat, add the onion and cook until softened. Add the basil, rosemary, jalapeno, stock, tomato puree, beans and salt and pepper. Bring to the boil, add the pasta and cook under al dente (tubettini cooks in 5-6 minute).
3. Leave to stand for 30 minutes to allow the flavors to mingle. You can either serve the soup at the temperature it cools to (the more traditional way), or reheat. Serve with a drizzle of extra virgin olive oil and finely grated Parmesan.
